One of the problems in the Automation is How to communication between device like PLC, but these problems can be solved with protocol communication over rs232 or rs485. In this case between PLC fatek communicated with fatek protocol. Next tutorial will using Modbus protocol to communicating between 2 devices.
Salah satu permasalahan dalam dunia otomasi adalah bagaimana cara komunikasi antar devices seperti PLC ke PLC. Namun masalah tersebut bisa diatasi dengan berbagai protokol yang saling terhubung menggunakan interface RS232 atau RS485. Disini kita menggunakan fatek protocol untuk berkomunikasi, tutorial selanjutnya akan menggunakan modbus protokol.
 |
| fatek to fatek |
Pada PLC master (sebelah kiri) berfungsi untuk mengontrol(read and write) ke PLC slave menggunakan port RS485. Cara kerjanya yaitu jika Y0 pada master ON maka Y0 pada slave juga akan ON dan M0 pada master ON maka Y1 pada slave juga akan ON
In the left side,PLC as master can read and write to other PLC fatek, and in the right side PLC as slave. Example, if output Y0 in PLC Master on (left side),output Y0 in PLC slave will ON(right side)
- Pertama tama hubungkan port RS485 D+ (master) ke D+ (slave) begitu juga dengan D- (master) ke D- (Slave)
First,Connect port RS485 D+(master,left side) to D+(slave,right side) and D-(master) to D+(slave) and gnd(master) to gnd(slave)
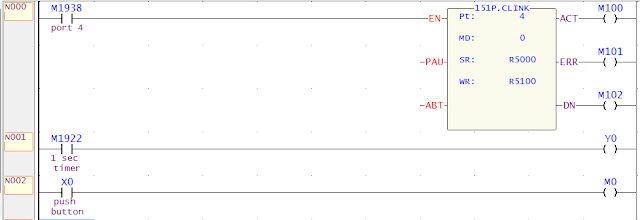
- Hubungkan kabel plc programming PC ke PLC master dan buat Program seperti dibawah
Ubah M1938 (port 4) jika menggunakan port selain port 4 untuk komunikasi antar PLC
Connect your PLC to PC and change M1938,if your port RS485 not port 4, follow this intructionM1960 = Port 1 Busy Indicator
M1962 = Port 2 Busy Indicator
M1936 = Port 3 Busy Indicator
M1938 = Port 4 Busy Indicator
 |
| step 1 |
Penjelasan :
Pt = port (diisi 4 karena menggunakan port 4)
Md = 0 {0 =Master station mode for FATEK CPU LINK. 1 = Only transmitte data (free protocol). 2 = Only Receive data(free protocol) }
SR = Starting Register of communication tabel (isi R5000)
WR = Working Register (isi R5100,hanya membutuhkan 8 register,only using 8 register)
- Kemudian klik PLC -> online untuk download. klik menu tab PLC -> Setting -> Station Number -> isi 1 dan centang Save to Program
And then click menu tab PLC -> Online for download, and then click menu tab PLC -> Setting -> Station Number = 1 ,check Save to Program
Pada PLC Master,station number = 1 dan pada PLC Slave,station number = 2. Tidak boleh sama !!
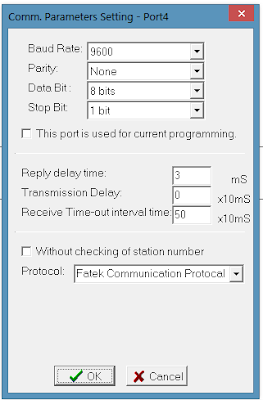
PLC Station in master and slave Must NOT be the same!! Set Station number PLC Master to 1 and Station Slave to 2 - Sekarang setting baudrate dll di port 4 Master, klik menu tab PLC -> Setting -> Port 4 Parameter (karena menggunakan port 4)
Setting baudrate,click menu tab PLC -> Setting -> Port 4 parameter(if your rs485 module using port 4)
 |
| step 2 |
- Sekarang membuat Link table pada PLC master. Pada sebelah kiri menu pilih Table Edit -> klik kanan Link Tabel -> New Link Table -> ikuti gambar dibawah
atau klik menu tab Project -> Link Table -> New Link Table
Now,Create Link Table,in left side right click Link Tabel -> New Link Table -> follow this intruction
or click menu tab Project -> Link Table -> New Link TablePada Table starting address samakan dengan SR pada CLINK function di ladder
In Table starting address, fill R5000(see CLINK)
 |
| step 3 |
- kemudian klik Add dan isi seperti gambar dibawah. Bagian dibawah ini berfungsi untuk membuat table yg akan mengontrol PLC slave
Click Add and fill column, see this picture
 |
| step 4 step 4 |
Penjelasan
Slave station = 2 (karena akan mengendalikan PLC pada slave dengan station number 2)
Command = Write (karena hanya menulis data,only write data)
Data Lenght = 1 (karena hanya 1 data dikirim,only 1 data to send)
Master Data Start Adrress = Y0
Slave Data Start Address = Y0
Jika Y0 pada master ON maka Y0 pada slave akan ON sama seperti gambar dibawahnya, jika M0 pada master ON maka Y1 pada slave juga akan ON
Pada Master dan Slave Data Adress dapat diisi bit seperti M,X,Y,S ataupun word seperti D,R,C,T
- Setelah semua selesai klik menu tab PLC -> Run PLC untuk running PLC
Run your PLC,click menu tab PLC -> Run PLC for running PLC - Hubungkan PC ke PLC Slave,download blank project dan pada bagian slave tidak perlu setingan apapun kecuali setingan port dan station number
Klik PLC -> Station Number -> Diisi 2
Connect your PC to your slave PLC, Click PLC -> Station Number -> 2,check Save to Program - Kemudian klik menu tab PLC -> Port 2 Parameter (karena pada slave menggunakan port 2) dan ikuti gambar dibawah
And then click menu tab PLC -> Port 2 Parameter-> 2
 |
| step 5 |
If led tx and rx blink in master or slave, your connection succesfully
Led Y0 pada slave akan berkedip (blink) sesuai program kemudian hubungkan push button pada master ke X0,seharusnya jika push button X0 on maka Y1 pada slave akan on.
Good Luck
وَعَلَيْكُمْ السَّلاَمُ وَرَحْمَةُ اللهِ وَبَرَكَاتُهُ

0 komentar "Communication between 2 PLC Fatek using fatek protocol over rs232/rs485", Baca atau Masukkan Komentar
Post a Comment
Jika artikel ini bermanfaat bisa dishare gan, tapi ingat selalu cantumkan sumber jika ingin copas artikel ini